Showing posts with label furniture. Show all posts

Saturday, June 30, 2012

Lessons of a Lectern

Lou Quallenberg peeks through the crack in the Mesquite Lectern
Each new  project usually brings with it a set of lessons and insight into an artist's ability. We always find that each new project helps stretch and grow us in both art and in spirit.  The clients for this project: The Mesquite Lectern, have played a distinct role in stretching Lou Quallenberg artistically as well as spiritually and for that we are so very thankful.


The Lectern was part of the original order for the Chapel with the Dancing Trees and Benches/Pews. Since there was no specific time frame or deadline for this project Lou was able to develop the piece while working on other projects. This gave him a chance to play with the piece and in doing so, add a pop up shelf and small fold down reading light.

Lou stands next to the face of the lectern to establish size for the client progress report.
The project began with a unique slab from the same tree that the Dancing Trees were cut from. Lou wanted to save the shape of his unique slabbed piece of mesquite but also make it "Dance" alongside the Dancing Trees. 
Sketch of Mesquite Lectern
Lou's work almost always begins with a sketch. He usually has an idea of which mesquite slab he will be working with. That helps to develop the sketch which then gives the client a visual confirmation that he is moving in the right direction. 

The YouTube video below shows Lou Quallenberg & Shawn Walker as they begin to carve the Mesquite Lectern with a chainsaw.

Lectern begins to take shape
Progress report photos for the client.
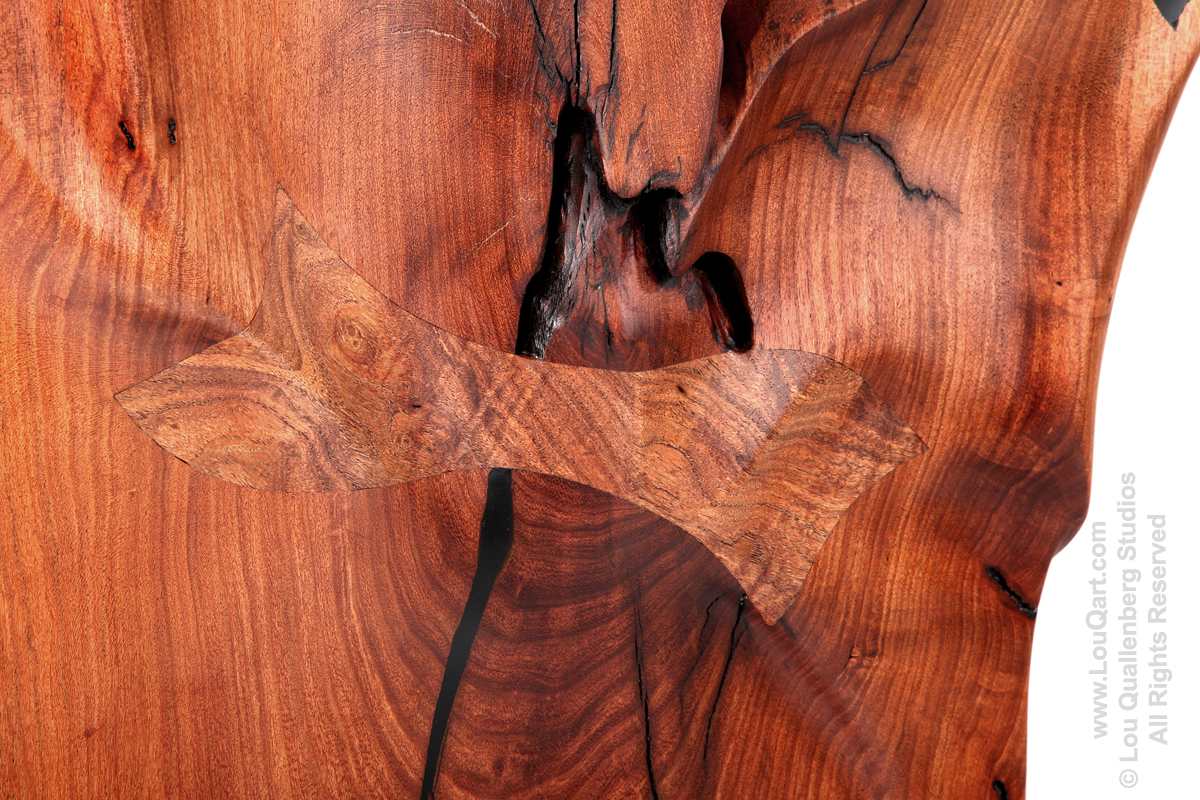
Lou Quallenberg's Signature Mesquite Bow Tie
Progress reports  and photos are regularly emailed to clients to keep them up to date on their special piece. This allows the client to help direct the design decisions that need to be made and gives them the feeling of participation as well as anticipation.


Lou Quallenberg's Signature Bow Tie  on the Lectern makes a  symbolic cross shape and holds the large crack in place.  We have several clients that request the Bow Tie even if it is not required structurally to hold their commissioned piece together. They like Lou's  Bow Tie purely as a design element. The  Bow Tie  on the Mesquite Lectern was also sculpted to add dimension and catch the light . This required an extra thick, BIG Bow Tie in order to to have room to sculpt it.

Lou with Lectern in the shop for @LAST Art Tour before the finish. 
Photo by John Hallowell - Highland Lakes Weekly

The Mesquite Lectern was in the shop for quite a while as Lou worked on other projects it even made an appearance, showing off its basic shape at the @LAST Llano ART Studio Tour.     


The Mesquite Lectern was professionally photographed by Lou before she was taken on delivery to her new home in the chapel alongside the Dancing Trees.  


Mesquite Lectern by Lou Quallenberg
Lou Quallenberg's Mesquite Lectern
Shelf DOWN Light UP
Shelf UP Light DOWN


Light from front in DOWN position.
Light side view in DOWN position.


Lou Quallenberg with his Mesquite Lectern
Many Lessons were learned as Lou Quallenberg stretched creatively and spiritually to create the Mesquite Lectern.

DELIVERY DAY
Arriving at the Chapel in the scenic Texas Hill Country
Entering the Chapel
Making its way into the Chapel towards the Dancing Trees
Mesquite Lectern in its rightful place alongside the Dancing Trees
The Dancing Trees and Benches admire their new friend the Lectern.
 A final touch goodbye


Monday, April 30, 2012

The "Susan" Mesquite Table: A "Birth" Day


Birthday Ride to Enchanted Rock
April is our birthday month here at Lou Quallenberg Studios.  Mine arrives first on the seventh followed a week later with Lou's on the fourteenth.  Two Aries rams butting heads until one of us decides to be the lamb. We celebrated mine  this year with a beautiful, bluebonnet filled ride to Enchanted Rock on the Harley.  Lou spent his in the shop where he is truly happiest working with his mesquite. I tried to get him out but he said it was his birthday and he could do what he wanted.

April is also the "birth"day for the "Susan" Table.  She was all finished up and delivered on Sunday the 29th. I know Lou felt a few pangs as he let her go.  She went to a very good home and we know she will be well loved for a few generations at the very least.

HAPPY BIRTHDAY Susan Table!!

Here is her story:

"Susan" Table Mesquite  Slab Top
We first met with the clients knowing that they wanted a mesquite table that would go in an entry way under a painting.  Lou had carefully selected several mesquite slabs for them to choose from.  When  she saw the slab that would become her table our client knew it was the only one for her.

Conception: Lou created a sketch based on the mesquite slab that was chosen and the process began.

Conception: Lou Quallenberg's sketch of the "Susan" Table


Once the sketch was approved the slab and it's flitch (the rest of the slabs from the tree) was taken to Brandon Berdoll in Cedar Creek. Where they were placed in his kiln for drying.  Brandon has kiln drying of mesquite down to a science and he provided us with regular moisture content readings throughout the entire process.  The mesquite was in the kiln for a good eleven weeks.

Mesquite slabs stacked and ready for the kiln
The Kiln


Final moisture content reading on mesquite slabs dried in the kiln
Once the slab and its sisters were all dried throughout to a 7.5% moisture content it was brought back to Llano to begin the construction process.
Removing the mesquite bark
After the basic shape was defined and the outer edges were cleaned up the base curve was copied and calculated to create the laminated curve that is a signature to Lou Quallenberg's mesquite work.
Calculating the curve for the table base
Once the curve is designed the jig to capture that curve is created and carefully crafted.
The jig that creates the matching curve
Lou Quallenberg in the shop with his curve creating jig

The Laminated Mesquite Base Curve and Leg Pattern
The "Susan" Table got a new set of legs.  Lou gave the leg design a bit more curve because he is always trying to improve the design and look of his mesquite furniture pieces.

Mesquite Table Clamped and Ready for Final Design Tweaking

A First Glimpse at How the Mesquite Table Will Look

The Mesquite Base Curves Finally Together


Curved Mesquite Base Ready for the Finish

Lou's finish is a two week process of lovingly hand sanding the tung oil based finish into every nook and cranny on the piece.

Applying the Finish to the Mesquite Slab Top
 He then rubs the piece with a cream wax to seal it all in.  It is so satiny smooth to the touch.

First Coat of Finish on the Mesquite Base

Mesquite Slab Top With the First Coat of  Tung Oil Based Finish
Curved Mesquite Base All Finished
When he is finished with his finish each piece calls out for you to touch it. We encourage the touching an rubbing of a piece.  Even the underside of his mesquite furniture pieces are as finished off as the top.

The "Susan" Mesquite Table Ready for Her Closeup and More

Photography is the next step of the process.  Lou photographs each piece utilizing his skills and experience in commercial photography. The "Susan" was photographed in Tom Suarez's Studio because she was too large to set up properly in the shop.  Lou's work is difficult to capture photographically because of all the curves and curves and curves.....

Lou Quallenberg's "Susan" Table in Mesquite 116"L x 24"W x 31"H


After her photos the "Susan" Table was ready for delivery. Once a piece is "delivered" to the client the process comes to an end  for us and the delivery date becomes each pieces "Birthday" in our catalog of Mesquite Furniture pieces. Where each piece is photographed and the original client/buyers name and location is recorded to help track the provenance of the individual pieces.


Check out Jamail's in Horeshoe Bay, Texas
So going along with the birthday theme, I mentioned last month that I have stepped back into the world of work and my first love: flowers. The birthing or start up of a grocery store is such an amazing thing to be a part of.  It is very much like the birth of a baby with a great deal of pain at the end,  along with the reward of shiny new entity.  I have been involved in several store start ups with HEB's Central Market being the biggest and most difficult. It is challenging, frustrating work, that is at times very exciting and ultimately rewarding. I have seen it make grown men cry many times over.

The Jamail Family has handled this overwhelming task with such grace and efficiency, producing a wonderful gem of a store in the heart of the Hill Country.  I hope the floral department that I create for them can hold up to their high standards in quality and value.  I can't wait to finally get my hands on some of these flowers I have been carefully sourcing and ordering. Because that is when the real fun begins.

Thursday, April 28, 2011

A Mesquite Dining Table : Dinner is Served

The Sketch: Mesquite Dining Table
I just noticed that in all these blog postings we have not ever shown a mesquite project complete from start to finish. Since the mesquite dining table was recently delivered in time for Easter Dinner and we happen to have all the photos of the project from start to finish handy on the desktop of my computer a mesquite dining room table will be our first project shown from beginning to end.

Most of Lou's mesquite furniture projects start with a sketch.  The sketch is a way to make sure he is on the same page as the client.  This project started defined as as a mesquite dining table.  The client  knew he wanted Lou Quallenberg to design a mesquite dining table for his second home that would seat eight comfortably.  We had photos and dimensions of the room but no decision on the shape of the table: rectangle, square or round.  In order to help the client make a decision Lou made scale model versions of a square mesquite dining table and a rectangle mesquite dining table. He had enjoyed making the tiny scale models of "The Dancing Trees", the chapel and benches so this was inevitable. Several clients have expressed interest in the tiny model versions but I doubt it could ever be a profitable business model and talk about a niche, niche market. Not just mesquite furniture but mesquite dollhouse furniture!  We are however looking at smaller versions of some products as a product line but more on that in a future blog post......
Square Mesquite Table Model

Square  Mesquite Table Model


Rectangle Mesquite Table Model


After the client decided on a rectangle the approximate sized book matched mesquite slabs were found but once Lou started working with them the question became whether there would be enough space on the table to be comfortable. Lou recommended adding a five inch similar piece of mesquite down the middle to give a bit more elbow room and space on the table and the client agreed.

Two mesquite slabs too small?
Center strip added for size.
Brent Catterton's Shop
Rough mesquite dining table with tiny model.
 Once the three pieces were joined the top required some evening up and major sanding. Since Lou does not have a wide belt sander but an artist friend that makes beautiful doors has one, Lou Quallenberg asked Brent Catterton of Catterton Woodworks in Boerne, Texas if he could give him a hand and run it through his machine - a step that would literally shave some time off the project. In this solitary workshop life sometimes it is really nice to visit with and share ideas and information with another artist.  Lou drooled over the sander and the rest of Brent's shop and set up, a scene that has played out in reversed roles many times before.

Seeing the pieces all fit together roughly for the first time is always kinda magical.  The table still required hours of sculpting and shaping but visually it was well on it's way at this point. Looking more and more like the tiny model version.  
Black epoxy fills the hole.
A mesquite knothole inlay.
Knothole inlay?
The sculpting of the mesquite tables edge revealed that the one dip was going to be deeper and larger than Lou had originally thought.  The table was to have a sprinkling of turquoise inlay throughout  but this was a large spot. Lou filled it in with black epoxy and then tried to come up with a better solution than a large sunken black spot or turquoise spot. My brother, Shawn's idea was to use a knothole as an inlay to fill in the dip. Lou agreed and thought maybe it would add a bit of interest and camouflage.  The client also preferred the look of the knothole so Lou went for it with his usual attention to detail. Another wood artist friend has already told Lou he would be stealing this technique for one of his special projects.  That's the thing about artists they are always taking each others ideas and making them their own.  It is flat out copying that we frown on, but can also see the flattery in.
Attaching legs to the base.
Pouring the Waterlox Tung Oil
Bob Pheil sprays a layer of the Waterlox finish.
The legs were attached to the base and final sanded for Lou's hand rubbed oil and wax finish.  The mesquite top being used for a dining room table in a family with young children would require a more durable finish than Lou normally uses. Lou had brushed on the more durable Waterlox Original Satin tung oil finish in the past but artist friend and neighbor Bob Pheil of Pheil Forges had recently had success spraying the finish onto one of his pieces and offered to spray Lou's top.  Lou stood by and wiped any drips as the eight day process built up a beautiful, layered, durable finish. 
Lou Quallenberg wiping up drips.
Delivery is always an exciting day as the client gets their first look at their much anticipated new piece. It can also be a day of creative solutions as sometimes the homes have extensive landscapes, interesting entrances, and objects and animal that must be navigated through.  This delivery was relatively easy compared to a few in the past.
Delivering can be a tricky process.
Top and base ready to be joined in their new home
Placing the mesquite top on the base.


We had our artist friend, helper and deliveryman Karl Rhodes and his lovely wife Mary along for the ride.  It was a beautiful day to be out and about in the Texas Hill Country. Because we were in the area  we ended up taking in a demonstration by Wimberley glass artist Tim deJong of Wimberley Glassworks. Lou would love to collaborate with him one day.

Saying goodbye as a new owner finds her spot.
Lou Quallenberg always has a hard time saying goodbye to each piece, as he has released a part of his spirit to be left with it. 

I had fun watching as the children on this delivery picked their favorite special spots on the table.  I hope that mom agreed with their choices because they seemed pretty determined that their choices would be their spots for the many future meals they would enjoy on it. I am confident it will become a treasured family piece either way.